
8 Best CMS Platforms to Build your next Website in 2022
Not every person who desires to build a website is a programmer or coder. It is the work of professionals. However, it is also true that not everyone can afford to hire a professional to get the job done.
So, whether you can not code or can not hire a coder, a CMS or Content Management System is one of the best choices for you to build a website.
A CMS platform lets you build a website without any need to create every single page from scratch with code.
There are numerous content management system options available. And it can make you struggle to find the accurate one as per your requirements.
Each CMS has its strengths and shortcomings making it crucial for you to look into them properly before making any final decision.
Today, we will talk about the eight best CMS you can choose in 2022 to build your website. Whether it’s a blog, a business website, or another, these CMS platforms will serve you the best.
Things To Consider When Choosing a CMS
Before we begin exploring the different content management systems of 2022, you need to know how to find the best one according to your requirements.
Below, we have mentioned some crucial factors to consider when narrowing down a CMS.
Ease of Usage
The first thing for you to consider is the ease of usage. You need to check how easy or tough it will be to work around a CMS.
Some CMS are more complex than others. Do not go for a platform that is hard for you to navigate.
Customization
Ease of usage is crucial, but simultaneously you want to look for the customization options. A CMS that can offer more customization options provides more flexibility.
The more you can customize, the easier it will be for you to make changes and grow your website.
Protection
The next feature you need to consider is protection. The online security of a CMS needs to be robust. People prefer websites that can keep their data safe.
So, you need to check if the platform you are going for holds what features to secure your website content, visitor information, and more.
Also, check about the website backup, software updates, security add-ons, etc., work concerning each option.
Pricing
Money is your best friend that holds power over most of your decisions. So, you require an option that can meet all your requirements, your prospect’s expectations, & most importantly, your budget.
Going overboard will not help you because the costlier the plan, the more it takes to maintain it.
Luckily, almost every platform offers various levels of plans with diverse resources. You can upgrade anytime you like, without any problems.
Word in the Market
The final factor is to check the reputation of the platforms in the market. Look what people are saying about each of them.
Check if credible brands across different industries are using them. And if yes, see their growth & performance.
Doing this research will let you know if a CMS is worth spending your time & money or not.
List Of 8 Best CMS Platforms To Build Your Website In 2022
Now that we know how to choose an ideal platform, it is time to move forward.
Here, we have the eight best CMS platforms of 2022 for you. Whether you want to start a blog, an eCommerce website, a marketing website, or more, all the names listed below can be of great help.
Different platforms are well suited for different niches. So, if you are clear on what you want to do, finding an ideal CMS should not be a problem.
One of the most popular CMS software in the market is WordPress.org. It is a free, open-source CMS that you can use to form different kinds of websites and online stores.
This platform is based on PHP & MySQL and offers numerous tools to make websites or blogs filled with high-end features like written content, images, videos, & more.
HostGator is one of the best web hosting providers that you can use to build your website.
Key Features:
Beginner-friendlyIt has the largest collection of themes & pluginsThe maintenance is time-consumingPricing varies for different features like hosting, premium themes, etc.
HubSpot CMS Hub is the perfect combination of ease & strength. The platform is built to help people make a website and manage it on various devices to reach every possible prospect.
This software is ideal for small to large businesses. Anyone with little to no technical knowledge can use it with utmost ease.
One of the best things about this platform is that you can overlook the work & performance of your website in the same place you created it.
Key Features:
It comes integrated with HubSpot’s other services like marketing, sales, CRM tools, & moreMany prebuild templatesGlobally hosted CDNA built-in WAF keeps your site safeTwo premium plans are available
Joomla is one of the most intriguing open-source CMS with a long list of impressive & unique features. It is highly versatile and user-friendly at the same time.
With this platform, you can easily build pages in various languages, customize using different inbuilt themes & templates, and handle numbers of users.
The only issue is that you can do it all only at the backend of your website. Thus, it is not an ideal choice for absolute beginners.
It is best suited for firms & individuals with a technical background.
Key Features:
Overall navigation is easyNot ideal for people with no knowledge of web developmentThousands of extensions are availableInstallation & managing of extensions can be hardIt lacks a few security features that can leave your website weak
Average Pricing: $700 to $6,500 to create and maintain
If you want to build an eCommerce website, then WooCommerce is the most popular platform in the world for it. Not only it’s flexible but simple to handle.
WooCommerce is not entirely a CMS platform. It works as a plugin on WordPress. So, if you want to use WooCommerce, you need to have a website on WordPress.
It is free software with thousands of available themes to get you started. Also, the additional features help you enhance your website & its performance to the next level.
Key Features:
Highly popular for marketing websitesFree softwareIt is a plugin for WordPressIt comes with PayPal & Stripe payments by default. But you can add others via extensions
Average Pricing: FREE
Wix is a cloud-based web development platform that allows you to make well-optimized websites with no fuss. It is one of the most beginner-friendly CMS out there.
It offers both free & paid plans, and you can opt for whatever you feel comfortable with. One of the best features about Wix is that it offers a drag & drop system that lets you add functionality to your website by simply installing plugins.
This platform supports HTML5, offers a wide range of plugins and pocket-friendly prices for business plans.
The all-new Wix Turbo allows better performance and boosted speed of its websites.
Key Features:
Supports HTML5Easy drag & drop interfaceMany pre-made templates to work with
Average Pricing: $13 per month (Paid Annually)
BigCommerce is another highly popular platform to build eCommerce websites. It is beginner-friendly and offers a multi-channel approach to selling.
Like Hubspot and WordPress, BigCOmmerce also offers to host your site. You get your website security & backups handled for you. It is affordable and offers individual to organization-based plans.
Furthermore, it can even pair with WordPress, giving your website the best of both worlds.
Key Features:
Come with a trial plan24/7 customer supportIntegrate with WordPressBeginner-friendly
Average Pricing: $30 per month
Another selling-friendly CMS that is ideal for eCommerce and first-time sellers is Shopify. With the help of this platform, you can set up, customize, and manage an entire online store.
Shopify makes running an online selling store just as easy as a regular website. If you are an absolute beginner, its built-in tools can help you immensely to get your store up & running.
Not only this, the CMS handles all the software updates & other management of your website for you.
Key Features:
All in one hosted CMSIdeal for first-timersCome with integrated payment solutionsHave a limited selection of applications & themesHandle the backups & software updates for youOffers three premium plans ($29, $79, $299/month)
Average Pricing: Basic plan for $29 per month
WordPress.com might sound similar to WordPress.org, but they are poles apart. WordPress.org is an open-source & self-hosted WordPress, whereas WordPress.com is a commercial version.
Opting for WordPress.com gets you an all-in-one CMS platform exclusively hosted for you. You can even purchase a domain name to get rid of WordPress branding.
Using this software is extremely easy, and the straightforward controls make it one of the best choices for beginners.
Key Features:
You can use your domain name if you wantCreating a website is free of chargeBuilt-in analytics help you track the progress of your websiteLimited monetization options
Average Pricing: $4/month (Charged Annually)
Summing Up
Your website represents your quality, work culture, and dedication to your visitors. One mistake on your website can cost you a lot, making it crucial to look for good website-building platforms.
The listed 8 CMS platforms are the hottest ones in 2022 so far. So, if you want to get started with your online journey, going for one of them is a wise decision.
The post 8 Best CMS Platforms to Build your next Website in 2022 appeared first on WPressBlog.
Read more: wpressblog.com
What is WordPress Multisite and How to Create It?
WordPress is a widely utilized and versatile content management system that will power 43 percent of websites in 2021. Those with only a minimal understanding of computer technology can create web pages using the system’s free and simple features or you can look at some of the top WordPress development companies and they will help you if you want to make a custom made website WordPress is open-source so you can make the best use of this.
In order to build an exceptional website, WordPress provides a variety of alternatives, one of which is WordPress multisite. With the help of this essential function, each WordPress user can create their own independent network of subdomains for a variety of different purposes. It was created to replace the multi-user version of the WordPress software, which allowed users to manage their templates and settings in a private and independent manner from the rest of the community.
What is WordPress multisite?
It is possible to create a network of websites that are all powered by a single WordPress installation using the WordPress Multisite functionality of the platform. Because the network makes use of a centralized database and file system, you can manage everything from a single dashboard, including themes, features, and user roles, among other things.
Your network can remain private, for example, a local firm can construct a network site for each location in which it operates. For a more public network, you might make it available to the public and allow users to register and create their own sites within it, similar to how WordPress.com works.
How WordPress Multisite Works?
Multisite WordPress install function in a similar way to ordinary WordPress installation, but with a number of additional features.
Let’s have a look at some of the key differences between WordPress Multisite and a conventional WordPress installation to gain a better understanding of how they differ.
User Roles and Permissions
WordPress websites are pre-configured with five different user roles. Administrator, editor, author, contributor, and subscriber are all named in the order of their authority, starting with the most senior one, In Multisite, a new position is introduced which is placed above the administrator and are referred to as “Super administrator” (also called the network administrator, or the super admin for short).
The super admin user roles possess the greatest amount of power. The “subsites” of the network fall under them, and they are responsible for keeping an eye on them all at the same time. A single or a few administrators: nonetheless, the super admin has access to and control over every subsite of their network.
WP administrators who set up multisite networks are promoted to the position of the “Super admins,” and they get access to a significantly updated administrative interface. Network administrators can use this dashboard to manage the website that they are in charge of. Super admins have the ability to deploy plugins and themes to specific sites as well as the entire network. Multisite systems do not allow the installation of plugins or themes, though administrators can enable or disable them as they like.
In some cases, super admins may be necessary to create websites for new administrators or to grant permissions to other users to develop new websites, depending on how the network has been configured. In addition, super admins have the ability to assign administrators to one or more network locations at their discretion.
Themes and plugins
If you have a networked WordPress installation, plugins and themes will not be installed on separate websites. Rather than doing so, they are retained on the network and then activated on certain websites as required. Due to the fact that websites connected via a network share plugins and theme files rather than having each site download them independently, this is the case.
It is possible to activate themes and plugins across all networked websites while also controlling which plugins and themes are enabled and disabled on individual websites if you are a super admin. Furthermore, super admins have the ability to update themes and plugins across all subsites at the same time.
This is not how regular WordPress installations function, but it does allow for a more secure network to be created. Because all of the sites in the network share a common codebase, a malicious theme or plugin that is deployed irresponsibly by a website administrator may have a negative impact on the entire network as a result of the malicious theme or plugin. The network is more secure as a result of reserving this privilege for super admins.
Domain and Domain mapping
Creating multi-sites is as simple as adding subdomains to an existing WordPress installation. There is just one domain name for all websites on a Multisite installation, and it is the same name as the domain name for the central WordPress website. The partitioning of websites into subdomains (For eg, Website.network.com) or subdirectories (for eg network.com/website) is entirely up to the discretion of super admins.
You can also map custom domains to the network’s websites if you want the network’s websites to have their own different domain names. The visitors to the subsite will perceive it as if it were any other website as a result of this technique. You can map any domain to a subsite through the multisite network administration settings.
Code and storage
WordPress multi-sites are distinguished from standalone WordPress installations by the configuration of the back-end of the site. Similarly, all subsites in a multisite installation share the same core files, and all websites share the same WordPress installation.
Theme and plugin files are also stored in this common directory, allowing any site on the network to use the same themes and plugins that were created for it. Sharing these files across multiple sites, rather than maintaining separate versions for each, frees up valuable server space, lowers storage costs, and improves overall performance and efficiency.
Not everything, on the other hand, is shared across sites. A unique set of multimedia assets and data will be made available for each individual website. Consequently, each website’s back end contains its own uploads folder and database tables.
Benefits of using Multisite
Efficient management: When you are a network administrator, you can manage updates, backups, and the installation of security and performance-enhancing plugins all from a single WordPress dashboard.
Easier delegation: It is possible to delegate lower-level administrators to other websites inside a network, enabling site management responsibilities more easily shared between multiple domains.
Greater control: In the case of managing many websites, enabling WordPress Multisite gives you the ability to manage the plugins and themes that are utilized on each of your sites. In this way, the risk of malicious plugins or themes interfering with the network’s security or performance is reduced to a minimum.
Drawbacks of Multisites
Given the fact that all websites on a Multisite network share a database, backups and modifications must be performed on a broader scale across the entire network.
Considering that websites share server resources when the shared network goes down, all websites will experience a blackout. Additionally, if a cyberattack hits a single website, it is likely that additional websites will be impacted as a result of the cyberattack.
The amount of traffic received by other sites on the same network has a significant impact on the performance of each site on the same network. When the number of visitors to a website unexpectedly surges, the performance and speed of other websites may be adversely affected.
There are several plugins and themes that are not multisite compatible.
WordPress Multisite is not supported by all web servers.
A Guide to Multisite WordPress Installation
1. Prepare to switch to multisite
Ensure that you actually require a multisite network based on the requirements listed above before proceeding with the implementation of the network. If you’re ready, check the following lists.
You must be the site’s administrator in order to use this feature.To gain access to the critical files on your website, you must be able to FTP or utilize a file manager.When running a WordPress multisite network, it is necessary to have sufficient hosting resources.All plugins and themes should be secure and up to date at all times.Everyone who has access to your WordPress account at this time is a current, trusted user.
In the event that you already have a WordPress site up and running, disable all of its plugins. Additionally, this is a good time to create a backup of your files before completing the switchover to the new system. Install WordPress right away, if you haven’t already.
2. Edit wp-config.php
If you want to start using Multisite, you’ll need to make a few changes to your WordPress wp-config.php file. Access the wp-config.php file by browsing to the WordPress core files through FTP or your file manager and double-clicking on it.
Scroll down until you reach the line that says:
/* That’s all, stop editing! Happy blogging. */
Add the following code directly above this line:
/* Multisite */define( ‘WP_ALLOW_MULTISITE’, true );
Restart your browser after saving the file.
3. Set up a network
Following the addition of the aforementioned code to wp-config.php, you’ll see that several new choices have been introduced to your WordPress dashboard.
From your dashboard, go to Tools > Network Setup to begin configuring your network. On this screen, you can choose whether to refer to your subsites by their subdomain or their subdirectory. It is possible to establish a domain-based network via the use of subdomains, whereas a path-based network can be created through the use of subdirectories.
Even though you can make changes to this setting later, it is recommended that you choose your configuration immediately because switching gets more difficult the longer your Multisite is in operation.
Additional network configuration options include changing the server address (which is the major domain of your Multisite), changing the network title (which is what you want to call your network), and changing the administrator’s email address, if necessary (how you can be contacted as super admin).
When you’re finished with this screen, click the Install button.
4. Enable the network
Following that, you will be provided with instructions on how to activate your network connection. They’ll look something like the image below:

After you have finished changing each file, save it using the processes outlined above. Once you’ve finished, click the Login button to re-enter your information.
After that, you’ll be able to create more subsites and customize your multisite configuration. The network setting can be accessed by clicking my sites in the top toolbar and then selecting one of the dropdown options.
Conclusion
Managing a large number of WordPress sites can be difficult. Many responsibilities must be managed, including the application of updates as well as the configuration of new plugins. Even if you’re a seasoned WordPress user, these responsibilities can take up a significant amount of your time unless you use a management solution such as Multisite to streamline the process
Author Bio: Rids Vazirani
Rids has been working with WPWeb since Jan 2019 as Content Manager. He is a passionate content writer and has a love for WordPress and Digital Marketing so he spends a significant amount of time writing about it.
The post What is WordPress Multisite and How to Create It? appeared first on WPressBlog.
Read more: wpressblog.com
How To Check for Malware on Your WordPress Site & Get it Fixed?
If you’re here because you fear that your site has been infected by malware, you’re not alone. In fact, over 90,000 hacking attacks are attempted each day on sites like yours. This is because, for hackers, every website is a potential target – irrespective of its size. But, the good news is that thanks to the immense popularity of WordPress, website security is no longer a task to dread – with the right knowledge and tools on your side. In this article, we show you how.
Before we dive in, let’s take a quick look at how a malware attack can impact a website:
A sudden drop in the incoming traffic and SEO ranking – because of the redirection of your users to other unsolicited websites or search engines like Google suspending or blocking your website from organic traffic. To learn more about it check out this guide shared by Malcare.Loss of customer conversions and revenue for your online business, resulting from loss of SEO traffic or website malfunctioningLoss of customer records and data from your WP database, because of a successful data breachLoss of brand trust and customer loyalty, because of a negative experience with your business.
These are only a few of the many ways in which your online business could be impacted. Often, the overall business impact of a malware attack on your site could take weeks or even months to recover from. So, it makes simple businesses sense to always keep your website free from malware infections.
How Do You Detect and Extract Malware from Websites?
Before we begin, we recommend taking a complete backup of both your WP installation and database tables. Further, download or store your backups at an easily accessible location, from where you can easily retrieve and restore your backup to your website installation. You can use an automated backup plugin like BlogVault to do this.
Primarily, for malware detection and removal, you must perform the below steps:
Perform a complete scan of your website for any malware.Remove the malware infection from both your WP database and installation.Perform follow-up steps to ensure that your website is not infected with malware again.
Now let us discuss each of these steps in further detail.
Step 1 – Scan or detect any malware on your WordPress site

To perform this step, you can either go for the longer manual method or, the faster automatic way of detecting malware on your site. Let us look at each of them.
Malware scanning using automatic tools:
For WP sites, you can select various malware tools or plugins like Sucuri or MalCare. For instance, Sucuri has the free-to-download Sucuri Sitecheck tool, using which you can scan for any malware on your site.
If you are looking to perform an extensive or more in-depth malware scan on your site, you can use the paid MalCare plugin for fast detection. Another advantage of using this plugin is that it can also remove any malware if found on your site at no extra cost.
In case your website has been suspended or blacklisted, you can use the Google Transparency Report to find out the reason for the blacklist and then take the proper corrective measures.
Manual malware scanning:
For manual malware scanning of your WP installation and database, you need to open and check each of your backend files or folders that are usually targeted by hackers. These generally include critical files like the Core WP files, along with configuration files and database tables.
Here are a few of the targeted WordPress backend files and folders:
wp-content folderwp-config.php file.htaccess file
We recommend you to individually check if any of these files or folders have been recently modified using their date and time stamp.
Through either of these methods, if you detect any malware on your website or database, then move on to the next step.
Step 2 – Remove malware from your WP installation
Manual removal of malware from your WordPress is a two-step process, comprising of:
Cleaning the infected files.Cleaning the hacked database tables.
Before carrying out these steps, make sure you have the latest backup of the site – or have a fresh copy of WP (downloaded from the WP repository) with the same version as your current installation.
Simultaneously, ensure that you do not overwrite your wp-config.php file or the wp-content folder’s contents during the manual process.
Here is how you can clean your infected files:
Launch any FTP tool like FileZilla and connect to your WordPress installation using your FTP credentials.Identify the backend files or folders infected and replace them with the cleaner and corresponding file or folder – from your backup or downloaded copy.If you have customized any of the installation files, you need to open each of the custom files and check for any suspicious code. If found, then remove them manually from each file.
Next, here is how you can clean your database tables:
Sign in to your Database admin panel and search for any spam keywords or links in each of your database tables.Delete manually any such records containing suspicious entries or delete the entire table.
This manual scanning and cleanup process is effective for standard or common malware attacks. However, hackers are constantly innovating and coming up with smart ways of infecting WP files, in which case, this manual method may not be sufficient and effective in removing the malware.
As compared to this manual process, automatic malware removal is much less technical and complicated, and far more comprehensive.
This effectively removes all malware from both your installation files and database tables.Once you have implemented Step 2, you can request your web hosting company to restore your website operations to normal.
Step 3 – Ensure that your website is not hacked again in the future
Scanning and removing malware from your website does not mean the job’s done. You also need to ensure that it is not hacked again in the future.

To secure your website from future attacks, here are three follow-up measures that you can implement for this step:
If you have used the manual process to remove malware, it is a good idea to download and reinstall a fresh WP version – along with each of your installed plugins/themes. In case you are using an old or outdated version, update it to the latest available version that contains all the latest security fixes and patches.Reset all your user passwords to prevent attacks like the brute force attack, which target your login page. As a security practice, mandate the use of strong passwords with a minimum of 10 characters. Ensure that all your users are using unique usernames. Additionally, restrict the number of users with “administrator” (or admin) rights.Run another malware scan on your cleaned website and database to check for any hidden malware (also known as backdoors). Backdoors contain malicious code that can infect your website in the future. As it is not easy to detect backdoors, you need a powerful backdoor scanning tool that can search every installation file and database record and then remove the backdoors for good.Finally, the most effective measure that you take to prevent future malware attacks is by installing a security tool on your site. Amongst all, we recommend opting for MalCare as it’s advanced algorithm detects even the newest malware and is also effective against hidden backdoors. It also has an in-built web application firewall that can also block unauthorized IP requests from suspicious IP addresses, effectively fortifying your website and blocking future attacks.
 (Source: MalCare)
Conclusion
Experiencing a hacked website time and again is unfortunate, but not the end of the world. We hope that by following the steps mentioned above, you’ll be able to clean and restore your hacked website in no time. The first shift to make is to recognize website security as an important part of your WordPress maintenance tasks.
While we’ve discussed both manual and automatic methods of scanning and removing malware from any website, we suggest choosing automatic methods. This is because manual scans and cleanups require a considerable investment of time and effort and can stop short of finding more advanced and unknown malware. Security plugins are designed exclusively for WordPress and combine several best security practices in their offerings at competitive prices.
Are there any other security concerns you have? We would love to hear from you. Good Luck!
Read Also:
How to Increase the Maximum Upload and PHP Memory Limit
The post How To Check for Malware on Your WordPress Site & Get it Fixed? appeared first on WPressBlog.
Read more: wpressblog.com
How to Make Money Blogging
Disclosure: This content is reader-supported, which means if you click on some of our links that we may earn a commission.
I’ve had days where I made ten thousand dollars on my blog. It’s not even out of the ordinary.
Now it took a ton of hard work and dedication to reach millions of readers. You need serious traffic to make that kind of money. It’s not something you should expect to achieve overnight.
That said, all that stands between you and this kind of success is your time and effort.
Plus, there are way more ways to make money blogging today than when I first started. Making an extra few hundred dollars a month is not that far off, if you are willing to put in the work.
In this guide, I’ll show you the exact way to make money from blogging by avoiding the mistakes I’ve made in my 10-year journey.
Sound good? Let’s begin.
Your 2-Minute Cheat Sheet
The very first thing you need to start making money is to come up with an idea and the name for your blog. Think through the topics you’d want to write about often.
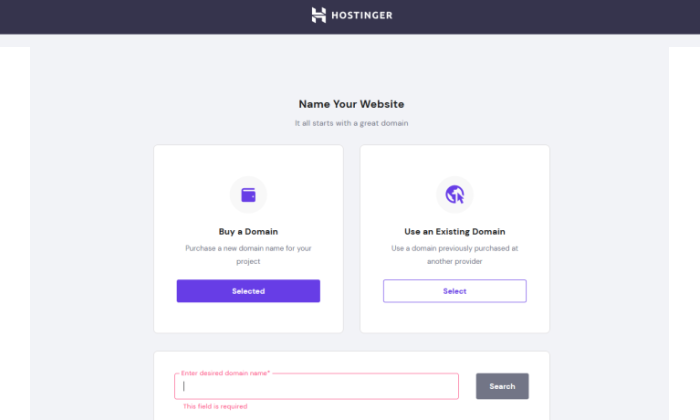
After that, sign up for the WordPress Starter plan with Hostinger. Even if you don’t have much of a budget, you can lock in an affordable rate of $3.99 per month for four years.
After you select your hosting plan and create your account, Hostinger’s setup wizard will help with much of the rest.
Enter some details about your site and your site building experience level, then select WordPress as your platform of choice. Hostinger will install WordPress for you once setup is completed, so you don’t have to do a thing.
After that, you can select a template for your site or start designing it from scratch.
The last step is to select a domain name. With Hostinger’s WordPress Starter hosting plan (and higher plans, as well), a free domain is included. Just make sure to add on WHOIS privacy. A few extra dollars for better privacy and security can be well worth it.
And with this, you’ll have your blog site up and running. Hurrah!
The next step will be finally writing and publishing your first blog post.
Once you’ve got a few posts up and have started to attract some traffic, you can work on monetizing your blog to make your first dollars.
For this, you’ll have to sign up for a Google AdSense and Amazon Associates account to make money through ads and affiliate marketing, respectively. You can also sell your own products and services after successfully driving high traffic to your site.
That was the basics. Let’s get into the details now.
Step 1: Figure Out Your Blog’s Niche
The first on the agenda is to decide what your blog is going to be about. Whether you want to talk about marketing, CBD, veganism, or just random life stories, figure it out.
Remember, your idea doesn’t have to be revolutionary, but you do need a unique voice.
Here are two tips for deciding on a blog niche:
Choose Something That You Enjoy
I know that this sounds like a cliche, but it makes no sense to blog about it if you don’t love the topic.
Never start blogging about something that you don’t love—it will show in your writing and your readers will know. Moreover, you won’t be able to consistently produce top-notch content to build your audience and later monetize from it.
Make a list of things that get you naturally curious and that you enjoy learning about. Or think about what your friends and family come to you when seeking advice.
Find Out Whether a Prospective Niche Has a Readership
The only way you can earn money through your blog is if you have enough site visitors.
Let’s assume you’ve already figured out your blog niche and want to write about arts and crafts.
You make a smart decision to niche down further and develop a blog exclusively dedicated to either paper art or scrapbooking. While you enjoy writing about both topics, you prefer to focus on one primarily.
But how do you choose between the two options?
Answer: Do a quick Google search.

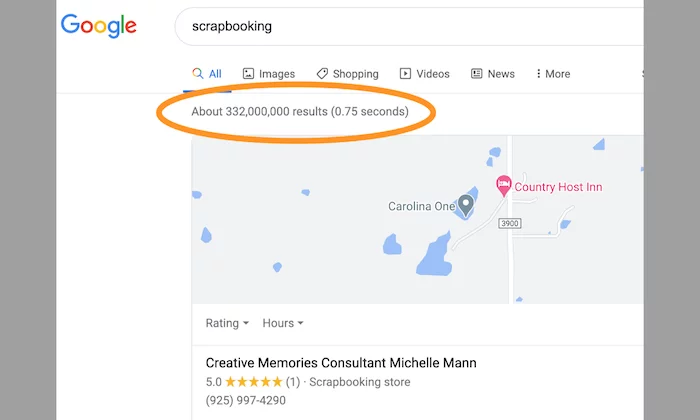
As you can see, there are far more results related to paper art as opposed to scrapbooking. Therefore, it makes more sense to write about paper art, which is what audiences are searching for.
I would also like to add that it’s better to avoid broad or generic topics. Don’t be afraid to get specific as long as you have takers for it.
For instance, if you want to create a food blog, don’t use words like “food.” Instead, use “barbecue” or “vegan.”
Get my point?
Step 2: Name Your Blog
Once an idea is in place, you need to work on naming your blog.
Does the name Stefani Joanne Angelina Germanotta ring a bell? Thought so.
But I bet Lady Gaga does.
Stefani Joanne Angelina Germanotta is Lady Gaga’s real name. She decided to go with a catchier and easier-to-remember alternative that aligns better with her music.

That’s the power of the right name.
Choosing a blog name is equal parts exciting and daunting. After all, this will be your brand name and dictate how people will remember you.
Don’t overthink it, and don’t name your blog something random or offensive.
Keep in mind the following questions when deciding on a name:
Does it reflect what your blog is going to be about?Would your target audience like it?Is the name easy to say and spell?Is it short and concise?
I chose my own name as my domain (NeilPatel.com) simply because Neil Patel is who I am, and it’s also my brand. You could do what I did or come up with something entirely different.
I’d recommend opting for a .com whenever possible. But they can get expensive, I know.
If all the good .coms are taken, don’t stress. think about your main URL keywords.
If you were aiming for talkCBDtome.com but somebody else got there first, try talkCBDto.me for something cheaper and every bit as easy to remember.
Don’t buy an available domain at this point. I have something up my sleeve to help you get it for free.
Step 3: Sign up with a Web Host Like Hostinger
You need to sign up for a web hosting service to get your blog live, along with a registered domain name that will serve as your blog’s address.
I recommend Hostinger, as its hands down one of the best web hosting companies—not to mention, it’s affordable. Head over to Hostinger’s website and click Start Now to see their hosting plans.
I recommend the WordPress Starter plan, because it’s the cheapest plan (just $3.99 per month) that also includes a free domain name.

If you have a domain, you can save even more and get the $1.99/month rate of Single WordPress. It has lower limits on site storage and monthly visits, but you don’t have to worry about exceeding those while you’re starting out. You can always upgrade later.
After you click Select, you’ll enter payment information and make your Hostinger account. Once the payment processes, you’ll be guided by Hostinger’s setup wizard.
It asks you three questions to start in order to give you the most helpful setup process: who you are creating the website for, what kind of website it will be, and your experience level with building a website.
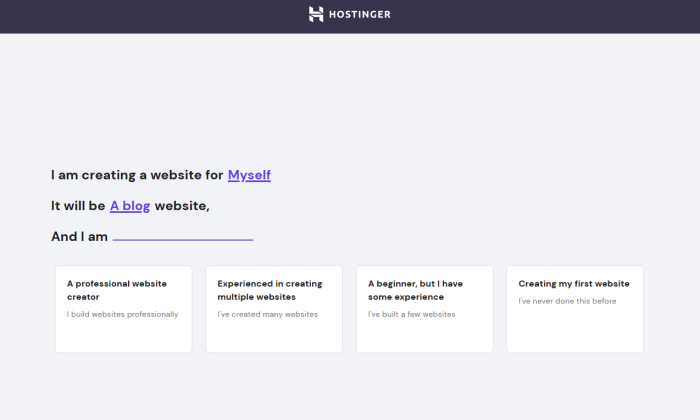
I’m pretty experienced with creating sites, but the rest of this walkthrough reflects choosing the path for beginners with some experience.
The next screen is where you’ll select WordPress as your blogging platform. If you don’t already have a WordPress account, Hostinger supplies a handy field to create one without leaving the setup wizard.
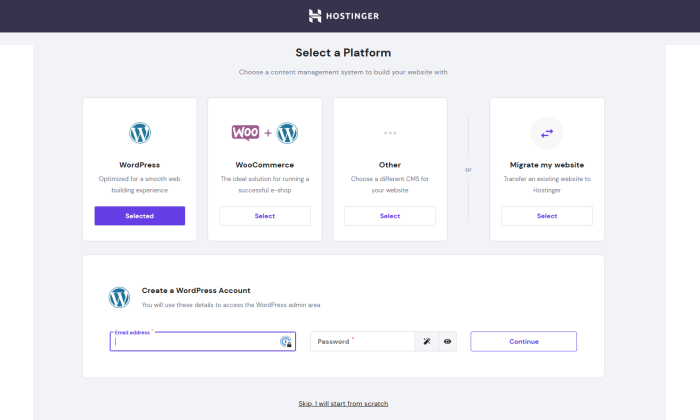
After that, Hostinger gives you the choice of picking a template or starting with a blank canvas of a site.
Then, you’ll secure that free domain included in your Hostinger plan. If you’ve already looked into the availability of your preferred domain, you’ll be able to quickly find it and checkout in one step.
The key, though, is to add on WHOIS privacy for an extra $10 per year. It’s not too much to pay to make sure your private information as a domain purchaser is not publicly visible or searchable.
Once you’ve checked out, Hostinger will take a couple minutes to complete the setup and install WordPress.
This is the point where you’ll have your blog!
Once the wizard is complete, you’ll be taken to Hostinger’s control panel, hPanel. Since WordPress is already installed for you, you can now start designing your blog to suit your style.
Step 4: Design Your WordPress Blog
To design a blog, you need to select an attractive and affordable WordPress theme.
Why do you need this? Well, after signing up for WordPress, your blog will look something like this:

Not exactly what you’d call sleek and welcoming, right? The way your website looks can help drive more website traffic, which, in turn, will enable you to make more money.
Luckily, WordPress has thousands and thousands of themes for you to choose from. I’ve even done a roundup of some of the best ones. Here’s how you can select a WordPress theme:
Log into your WordPress account.Click on Appearance in the sidebar menu on your dashboard. From the drop-down options, select Themes. 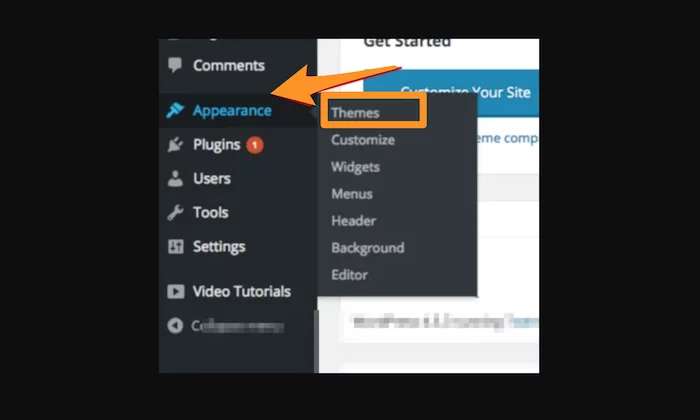 Go to Add New, located at the very top of the screen, to gain access to thousands of fancy WordPress themes. You can also click on Feature Filter to filter your search to see options more suited to your tastes.
You should choose a theme that fits your personal style, but at the same time, it should also be in sync with your blog niche.
Preview the theme to see what it will look like. If you like the sneak peek of a specific theme, click on Install and then Activate.
With a nice new theme, your website will get a much-needed upgrade that makes it look appealing to visitors.
Step 5: Come Up With Interesting Blog Topics
If you want to be successful blogging, you need to keep doing what you can to attract more website traffic or encourage more email signups. The best way to do that is through what you’re already doing on your blog posts: offering your readers interesting content.
But what if you’ve exhausted your best ideas already on previous blog posts?
My tip is to make a list of questions you get often.
Trust me, within just 30 minutes, you’ll be able to come up with a bunch of new potential blog topics. Your priority should be to look at things from your reader’s viewpoint.
You can also focus on higher-level questions. The five below are ones I suggest you ask yourself to get in your readers’ minds.
Suppose you want to start a parenting blog for stay-at-home moms. Let’s go through those five questions with that example in mind:
Q1) What could be an intriguing or exciting talking point for your readers?
For stay-at-home moms, topics related to sleep training, family activities, and budget-friendly meal ideas could be a great place to start.
Q2) What are your reader’s pain points and challenges?
Common household challenges for stay-at-home moms could be meal planning, understanding developmental milestones, and so on.
Q3) What are your readers’ character traits?
Moms are typically patient and caring and appreciate a sense of humor about the hard work of raising children.
Q4) What niche topics would appeal the most to your readers?
A child’s mental, physical, and emotional development could be effective talking points for stay-at-home moms.
Q5) What topics would your readers hate about the niche?
Stay-at-home moms don’t like to be looked down on by others. So, you could write blogs about how society views them and their impact.
Similarly, you can use the above questions to come up with ideas according to your niche. While you’re at it, don’t forget to work out a catchy headline that will make the reader instantly click on your blog.
Step 6: Optimize Your Blogs for SEO
Search engine optimization or SEO is a crucial step to earn money via blogging. Here, you will optimize your website to rank higher in search engines for specific keywords and phrases.
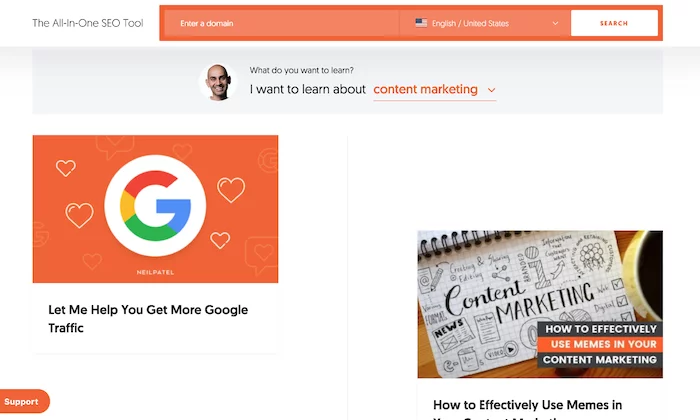
If you’ve been following me for a long time, you may already know how SEO is my trump card.
By incorporating particular keywords and phrases, I’ve successfully driven more than 30 million visitors to my website. Shocked?
That’s the power of SEO.
On WordPress, you can optimize your content and blog by downloading a plugin called Yoast SEO.
Go to the Plugins menu, and click on Add New. Search for Yoast SEO in the search bar, and then install the plugin.
Don’t forget to activate it to complete the installation process.
You’ll find that this plugin will give you all kinds of improvement tips and suggestions based on the keyword you select to help you optimize your content. I’d recommend incorporating as many suggestions as you can to improve SEO and content readability.
 Step 7: Sign up for Google AdSense
Setting up ads is the best way to monetize your blog. But you need to be smart about it.
The biggest mistake people make is to bombard their sites with blinking ads. Avoid this at all costs.
Instead, focus on using targeted ads that appeal to your customers without annoying them.
To start earning money through ads, you need a Google AdSense account. Head over to the AdSense page, and click on Sign Up Now. If you don’t have an existing Google account, you have to set up a new one. If you already have a Google account, simply sign in.

Fill out all the relevant information before submitting your application. The AdSense team reviews every application, and if everything goes well, you’ll be in!
Next, follow the below steps to set up your account:
Go to your AdSense dashboard and click on My Ads > New ad unit.Select the size of your ad and the type of ad. Once you’re done, select Save and get code. 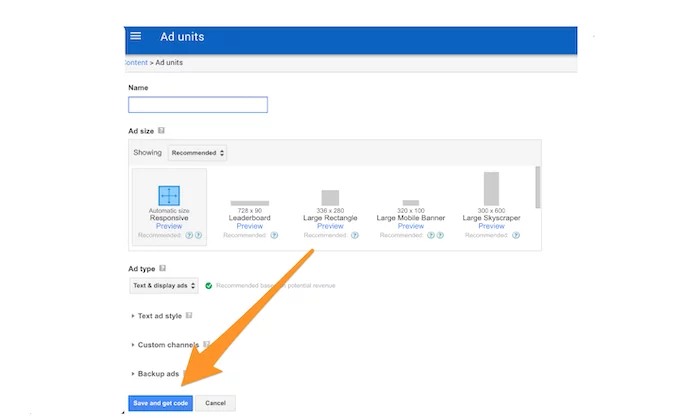 You’ll get a bit of code that you’ll then have to copy and paste between your page’s <body> tags. Here’s how it’ll look.
 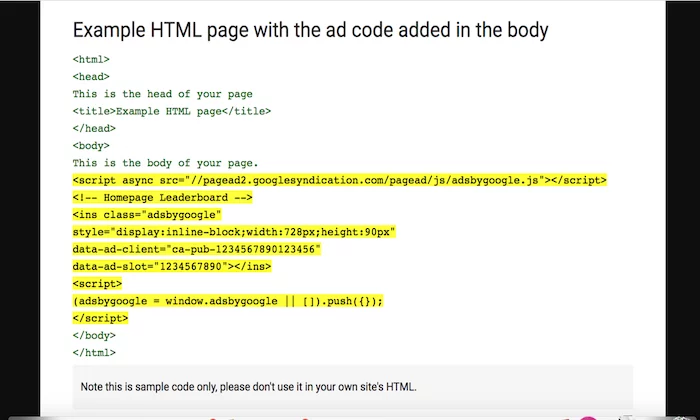 Once you’ve pasted the code, your ad will be live. Your AdSense dashboard will have all information about your earnings, so check it regularly.
While you can use ads on as many as you want, I would recommend starting with just one–maybe two max–to get an idea of how your audience responds to them.
If you see a higher bounce rate on your dashboard, you should consider repositioning your current ads for better results.
Step 8: Create an Amazon Associates Account
You might have already heard of affiliate marketing. If your goal is to earn passive income, leveraging the power of affiliates is your best bet.
You can start by signing up for Amazon Associates, which allows you to start earning right away through referral links, display ads, or Amazon-based shopping carts.
If your visitors decide to use your referral link or click on the display ads, you’ll get a small commission.
To sign up for Amazon Associates, all you need to do is visit the website and click on Join Now for Free.
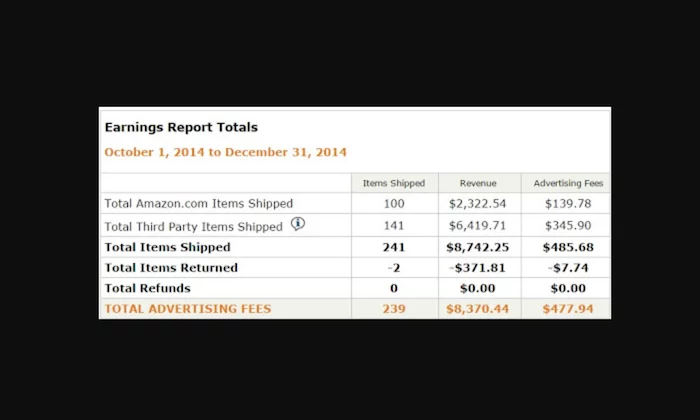
This can be pretty effective. Just check out these earnings of Brendan Mace for definitive proof.
Amazon Associates isn’t the only affiliate program.
You’ll be happy to know that there are plenty of companies with their own affiliate programs, some of which pay higher commissions than Amazon. Just make sure to research before signing up to be an affiliate for a brand.
That said, I’d also like to emphasize the importance of advertising only those products or services that you’ve used yourself or genuinely believe can help your audience.
Step 9: Offer a Product or Service for Sale (Optional)
Many people think that advertisements are the only source of income for bloggers. This might be true for a few, but you’ll also find many bloggers make quite a bit of money by selling a product or service.
Of course, this will only work when you already have a loyal readership with steady website traffic like Nomadic Matt. Once you’re at this stage, you shouldn’t be afraid to take the leap.
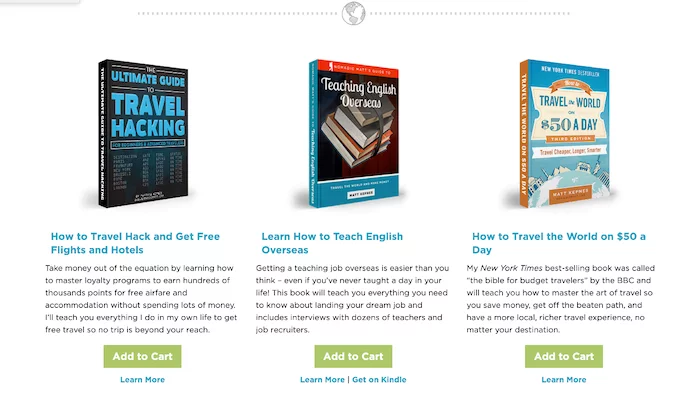
Here are a few things that you can consider selling:
Training coursesBooksVideo courses/webinarsCoaching servicesConsulting services
Next, you have to figure out how you want to sell your product. Services like Shopify or WooCommerce plugins on WordPress, Amazon, or Etsy are great options for digital products. If you’re selling a physical product (like phone cases or clothes), you’ll have to set up a more comprehensive ecommerce store.
Finally, let your audience know about your product or service by sending them emails. You can also consider developing lead magnets like pre-recorded webinars, PDFs, and whitepapers to build your email list.
How to Make Money Blogging Frequently Asked Questions Can you make money blogging?
Yes, there are a variety of ways to make money blogging; such as running ads, doing paid partnership posts, including affiliate links, etc.
What’s the first step to creating a successful blog?
The first step in creating a successful blog is picking a niche topic for your blog. Do market research and see what other blogs are already out there; you don’t want your blog to cover an area that is already dense with similar blogs. Also, try to pick a topic that has natural ties to money-making blog techniques, like a partnership or sponsored posts, or affiliate links.
How much do successful bloggers make?
As of 2020, successful bloggers can make up to 7 figures per year. But that’s only the very top bloggers in successful and popular industries, like marketing or parenting.
How long can I expect it to take for my blog to start making money?
Your blog may be able to earn money in as little as six months from when you start it.
{ “@context”: “https://schema.org”, “@type”: “FAQPage”, “mainEntity”: [ { “@type”: “Question”, “name”: “Can you make money blogging?”, “acceptedAnswer”: { “@type”: “Answer”, “text”: ”
Yes, there are a variety of ways to make money blogging; such as running ads, doing paid partnership posts, including affiliate links, etc.
” } } , { “@type”: “Question”, “name”: “What’s the first step to creating a successful blog?”, “acceptedAnswer”: { “@type”: “Answer”, “text”: ”
The first step in creating a successful blog is picking a niche topic for your blog. Do market research and see what other blogs are already out there; you don’t want your blog to cover an area that is already dense with similar blogs. Also, try to pick a topic that has natural ties to money-making blog techniques, like a partnership or sponsored posts, or affiliate links.
” } } , { “@type”: “Question”, “name”: “How much do successful bloggers make?”, “acceptedAnswer”: { “@type”: “Answer”, “text”: ”
As of 2020, successful bloggers can make up to 7 figures per year. But that’s only the very top bloggers in successful and popular industries, like marketing or parenting.
” } } , { “@type”: “Question”, “name”: “How long can I expect it to take for my blog to start making money?”, “acceptedAnswer”: { “@type”: “Answer”, “text”: ”
Your blog may be able to earn money in as little as six months from when you start it.
” } } ] } How to Make Money Blogging Conclusion
There’s a difference between simply having a blog and monetizing a blog. To make this transition successful, you’ll need to adopt a more proactive and focused approach.
You’ve got this!
Start with my guide for setting yours up. Get reliable hosting from Hostinger and it’ll take no time at all to get your blog up and running so you can start blogging.
Just remain focused and work consistently to keep improving your blog and build trust between you and your audience. And follow my steps above to get things started on the right track.
Remember to stick with what works, and you’ll have a successful formula.
Have you tried blogging yet? Let me know about your experience.
Read more: neilpatel.com
7 Mistakes That You Should Avoid While Setting Up a WordPress Site
Setting up a WordPress site is easy but there are several small yet important aspects that you need to know. To get the best performance out of your WordPress site, you need to know what are the mistakes that you should avoid at any cost.
If you are new to WordPress and looking for important tips to follow while setting up the site, we have you covered. In this post, we will have a look at the top seven mistakes that people generally make while setting up their site.
Avoid following mistakes while setting up a WordPress site
1. Choosing cheap web hosting
WordPress.org is a free and cutting platform, however, to make the best use of it, you need to have the best hosting plan. If the overall hosting is slower then it will not only ruin the user experience but also increase the bounce rate. A higher bounce rate can hamper your complete SEO efforts and let your competitors outperform you.
So, it’s important that while setting up a WordPress site, pick a reliable web hosting on which you can trust. The majority of the web hosting providers ensure 99.98% of uptime, but before being anyone, read their online reviews and rating. Read real reviews on third-party websites before finalizing the hosting.
Shared hosting is a good option to get started, but if you can spend a little more, then it’s highly recommended to go for cloud hosting. It is because cloud hosting is a dedicated server that ensures higher loading speed for your website. You can also take help from a reliable web development company that will help you with the same.
2. Not optimizing multimedia
We all love to greet our visitors with high-resolution images and videos. However, these high-resolution images and videos can slow down the overall loading speed. So, while developing the website, make sure you optimize the multimedia to keep the speed intact. There are several ways you can compress and optimize both images and videos.
As speed has become a major ranking factor to earn top organic positions, you can’t overlook the importance of optimizing multimedia. There are many lossless image compression tools available that are free to use for image optimization. Along with this, you can also use a content delivery network or CDM to manage the server load and increase performance.
3. Not using SSL certificate
Gone are those days when launching websites without an SSL certificate was fine. However, as search engines are primarily focusing on overall customer experience and security, SSL is vital. To put it simply, if your website is running on HTTP, then it does not have an SSL certificate. On the other hand, if your website is running on an HTTPS protocol, it. This means that your website has an SSL certificate.
No matter if you have a personal branding website, an E-commerce platform, or an enterprise website, it’s important to have an SSL certificate. If you plan to buy one for your website, contact your hosting service provider and get suitable for your platform. Similar to your web hosting, you also need to renew your SSL certificate to ensure it’s working intact.
4. Not monetizing the platform
WordPress gives you full freedom to monetize your platform and earn money from your content or by selling products. If you want to earn money through your website, you need to make the products easy to buy for your customers. For doing this, you can use plugins like Easy Digital Downloads. It helps you sell your digital products to customers easily.
On the other hand, you can also use the WooCommerce plugin to turn your website into a full-fledged E-Commerce store. By doing this, you can easily list, sell and start earning from the very first day of your website launch.
5. Ignoring the security plugin
With growing digitization, the security threats are also growing and you need to pay special attention to your website’s security. While using WordPress. You have multiple ways to add more security to your website to protect it from various security attacks. Some of the common security threats are brute force attacks, DDoS attacks, phishing attacks, and so on. To ensure your website and the users remain safe, it’s important that you use certain security plugins to level up the security.
File integrity is an amazing feature that keeps you updated if someone changes some code of your WordPress site so that you can act upon it immediately. You can use a WP Security Audit Log plugin to set up this feature on your website. One thing you need to keep in mind is that you have to keep the plugin updated so that it protects your website from all possible chances of code forgery.
In addition to this, malware is a serious problem that you need to deal with when you own a website. You can use a free plugin called Wordfence Security as it will scan all the files for malware that you download for your website. If there is something malicious, you will get instant notification from the plugin.
6. Not using auto-updates
WordPress is constantly updating and to ensure you get the best performance every time, you need to keep it updated with the latest firmware. Instead of installing the updates manually, it’s better to keep the updates on automation. It will save you a lot of time and effort.
You can use plugins like JetPack to ensure all the updates are done automatically and you don’t have to work manually on them. It becomes especially important when you are using a lot of plugins and third-party services with your website.
7. Not using a CDN
CDN or a content delivery network is an additional server to manage your images and bigger files. By integrating a CDN, your website’s all you’re bigger files and images are copied on the server which responds faster when visitors request them. When your website will have a large number of pages, images, and files, then a CDN network will come in handy.
Wrapping up!
Avoid these mistakes and ensure top-notch performance for your website. Gain an edge over your competitors by skipping these things and improving the overall performance.
Author Bio:
With over 13 years of experience as a leader in digital marketing, Mansi Rana is Managing Director of EZ Rankings. Passionate about all things data; providing actionable business intelligence in digital, future tech; and venture bubbles categories for everyone, everywhere.
The post 7 Mistakes That You Should Avoid While Setting Up a WordPress Site appeared first on WPressBlog.
Read more: wpressblog.com
7 Highly Effective CDN SEO Tips to Boost Your Rankings
Every business wishes to ace the SERP rankings. And while they optimize their on-page factors, site speed comes as a crucial consideration.
Google offers a crucial weightage to a site speed factor when compiling its page results. And here is where CDN puts up an appearance.
CDN bridges the distance between the main server and the user’s location. It hosts your site assets on globally-spread servers to minimize the response time for user requests.
CDN is one of the surest ways to shave off the extra seconds in your site load time. A faster loading site enhances your SEO performance.
But are you optimizing your CDN to maximize its SEO value for your business?
Let’s check these 7 Tips to Boost Your CDN’s SEO Value:
1. Ensure that Your CDN Exists on Your Subdomain
Are you unknowingly linking out your SEO value to your CDN provider’s domain?
It is a common mistake that businesses make while employing CDN.
They use the CDN provider’s subdomain to install their CDN services. This subdomain may look similar to – yoursitename.cdn.com.
Here you use the CDN provider’s subdomain to install the CDN services. And therefore, the SEO value of the resources hosted on the CDN passes down to the root domain- cdn.com.
The right practice is to create a custom domain in your DNS. The custom domain acts as your site’s dedicated subdomain to host your CDN service.
A preferable subdomain for your site can be – cdn.yoursitename.com
A majority of the CDN service providers allow the installation of CDN services on your site’s subdomain.
When the CDN service provider installs the CDN on your site’s subdomain, it becomes a proprietary service.
Now all the SEO value passes down to your root domain- yoursitename.com.
Therefore, you can now expect an increase in your site’s authority and SEO power.
You do not have to share your SEO value with your CDN service provider. And you can capitalize upon the perks of installing a CDN, i.e., increased site loading speed.
2. Use Webmaster Tools to Prioritize Your Target Location
If you wish to draw tangible results from your SEO, you probably have a defined target audience. And that means you target your content to a specific geography.
That said, you must inform the search engines about your geographical target location. And here, you can use your search engine webmaster tools.
If you use a CDN without informing Google about your target location, your CDN provider’s IP address is likely to use it.
And this can fade your SEO performance in your desired target location.
Therefore, prefer using Google Webmaster Tools and Bing Webmaster Tools to define your target geography.
Moreover, ensure that you follow the geo-targeting guidelines of these tools. Compliance with these guidelines helps you witness better SEO targeting and local SEO performance.
3. Define Consistent File Names and Paths when Employing CDN
When you employ CDN, you host some of your site resources on a new CDN server. And this is most likely to change the name or path of your files.
For instance,
Consider you have a gif image on your page, and its path is – yoursite.com/asset/image1.gif
Now, as you employ CDN, the CDN provider may change this image’s name. He can name it something like –
cdn.yoursite.com/assets/image001.gif or cdn.yoursite.com/images/image1.gif
Unless he follows the pre-CDN file name, it will show a 404 error. And you may have to redirect them to the original path.
The 404 errors and increased redirects will cost you considerable delay in response time. Moreover, you are putting your user experience and SEO at stake.
Isn’t it questioning the main objective of using CDN in the first place?
If yes, the right way to avoid any such issues is to follow your original naming conventions.
If your pre-CDN file name is yoursite.com/asset/image1.gif, your post-CDN file name must be cdn.yoursite.com/asset/image1.gif.
This practice negates the changes of unwanted 404 errors and redirects with CDN.
4. Escape Duplication Errors with Rel=Canonical Tags
Some businesses use CDN to reduce the number of HTTP requests on their servers. CDNs help them reduce the server response time by hosting or caching many site assets.
These assets include image files, JavaScript, large media files, CSS, etc.
Meanwhile, some businesses also host their entire site on CDN. They use their site’s subdomain to install the CDN and host a copy of their site on this network.
Now, for instance,
You have a page on your site – yoursite.com/SEO-services, then you will have its equivalent page URL on CDN as – cdn.yoursite.com/SEO-services.
Both these URLs target the same page, and this is a content duplication issue. It is most likely to impact your site’s SEO and can attract a penalty.
You also need to understand that this duplication issue can span site-wide.
And therefore, the right fix to this duplication error is the rel=canonical tag.
Use this tag to mark the original (pre-CDN) page – yoursite.com/SEO-services as canonical on the post-CDN page – cdn.yoursite.com/SEO-services.
Implement the rel=canonical tag across all the site pages that you hosted on the CDN server.
This action will tell Google to index your original pages instead of the CDN-hosted pages.
Google now transfers all the SEO value to your original site pages and retains their link equity.
5. Choose a Secure CDN Provider
While optimizing your site’s speed, you wouldn’t want to compromise on its security.
Moreover, Google lends the top-ranking positions only to secure sites.
A majority of businesses rely on firewalls and antivirus security standards. But the right CDN choice can further help them enhance their site security.
Popular CDNs employ robust hardware and offer seamless functional scalability. Moreover, they ace at battling DDoS attacks resulting from harmful malware.
Your CDN diverts a significant part of your server traffic. This reduces the risks of server breakdown during peak traffic times.
Further, the CDN acts as a bypass between user requests and the server. That said, if there are any malign requests, they do not directly pass to the server. And this mitigates the risks of server-crashing or getting hacked.
Therefore, choosing a secure and robust CDN has a significant say in your SEO performance.
6. Define the Pages that You Wish to Store on CDN
You do not want to keep Google bots or visitors waiting while your site loads. And that is a befitting reason to employ CDN.
However, setting up the CDN for the right pages is significantly crucial.You might want to host the entire website on CDN, but it isn’t always the best practice.
And so, you must cache the static and most frequently visited pages of your site. These can be your main service pages or product pages that attract high traffic. Moreover, the content on these pages is not likely to undergo frequent changes.
When you host these pages on CDN, their response time reduces considerably. Here, these pages are retrieved from the nearest CDN server instead of the main server.
You can modify the HTTP header to define the time for how long the CDN holds these pages.
Meanwhile, host the other dynamic pages like payment, delivery, etc., on the main server.
This practice ensures that you save a significant amount of site loading time.
7. Utilize CDN’s Image Optimization Capabilities
Would you care about investing time on a site or content with no images? Or would you buy from a site offering no product images?
The obvious answer is ‘No.’
You need media elements (images and videos) to complement the UX of your site. But, media files generally hold a larger storage space and slows down your site.
Therefore, you need to optimize and compress the media files on your site.
CDN comes to your rescue here. It enables automatic image optimization and compression while keeping the image quality intact.
The CDN brings forth several image format options and compression ratio options. So, whenever your page is rendered through a CDN server, images are already optimized.
That said, you can witness a significant improvement in the site’s performance.
However, image optimization through CDN only works on pages cached on the CDN. And the pages that are hosted on the main server might still need optimization.
Therefore, if you have image files on your dynamic pages, you also need to optimize them. You can use image compression plugins for the same purpose.
Will CDN Affect Your Site’s SEO?
CDN or Content Delivery Network has a far-reaching effect on your site’s SEO. It optimizes your content availability and minimizes your site’s response time to a user request.
So, a CDN enables caching or storing a copy of your site assets on its global servers (POPs).These assets include your media files, JavaScript, HTML, and CSS.
When a user requests a page, the CDN renders this page from the POPs closest to his location.
For instance,
You host your site in the US, and a user requests your site from his location in Europe. In this case, your US-based server will have to send all this data across the distance to Europe.
The larger the distance is, the longer will be the site loading time.
Now, in the case of CDN, your site assets are already loaded on the global POPs.
So, when a user in Europe requests your site, your page’s HTML is rendered from the main server. Meanwhile, CDN renders the JavaScript, image, and CSS assets from the closest POPs (London) to the user.
This significantly reduces the site response time and the overall site loading time.
Google’s Page Experience update considers page response time an important ranking factor.And therefore, a CDN-powered site performs better in the SERPs.
Google also recommends a page load time of up to 1 second or less for the mobile platform.While it would be hard to achieve this metric, CDN helps you get a little closer to it.
Moreover, a CDN site ensures faster content availability owing to the asset store. A CDN server also automatically optimizes the images on a site without degrading their quality.
This further compliments your site’s SEO value by enhancing the experience of your site.
CDN SEO FAQs
Q1. What if I Install CDN and Witness Some Negative SEO Effects?
Ans. A CDN or content delivery network brings positive SEO value by improving the site’s speed. But, it may attract negative SEO effects only if there are some CDN installation inaccuracies.
Some CDN setup mistakes include:
Installing the CDN on the CDN provider’s subdomain: This can pass your site’s SEO value to the CDN provider’s root domain.
Employing CDN services and caching a duplicate version of your site without adding the rel=canonical tag can attract content duplication issues and negative SEO for your site.
Not defining your target geographical location: In this case, Google will interpret your site’s target location based on the CDN server’s location.
Q2. Which CDN SEO Tips are Crucial for Your Site’s SEO Performance?
Ans. Here are the top CDN SEO tips that you must include:
Ask your CDN provider to install the CDN on your site’s subdomain. This approach ensures that the SEO value from your CDN-hosted pages passes to your site’s domain.
Follow the same file name conventions for your CDN subdomain as well. This ensures that there are no 404 errors and unnecessary redirections.
Define your target location using Google and Bing webmaster tools. It tells search engines where you wish to rank, or they may use your CDN’s location as your target location.
Use rel=canonical tag to tell the bots to index your original pages instead of the CDN-hosted duplicate pages.
Use the automatic image optimization feature of your CDN.
Q3. My Developers have Optimized My Site’s Speed. Do I Still Need a CDN?
Ans. There are some more factors that you must consider. These include:
High-traffic Sites: If you have an e-commerce site that attracts huge traffic peaks, you might need server clusters to support them. A better way to manage these peak traffic limits is by employing CDN. It bypasses the traffic, so it doesn’t bombard your main server. Moreover, CDN is a much more economical solution than server clusters and networks.
Speed and UX: CDN helps you manage latency by caching the assets of your site. Therefore, each user enjoys a better site experience irrespective of his location. This has a BIG effect on your site’s SEO power.
Security: CDN is adept at blocking DDoS attacks and malign hacking attempts. Your server lies behind the CDN server, and so malware attacks do not reach your server.
CDN Features: Many popular CDN services offer crucial site optimization features. These features include image optimization, geo routing, automatic redirection, A/B testing, etc.
The post 7 Highly Effective CDN SEO Tips to Boost Your Rankings appeared first on WPressBlog.
Read more: wpressblog.com
5 Ways to Strengthen the Retail Customer Journey for Your E-commerce Business
Buying products from e-commerce businesses has become commonplace in today’s digital landscape. People purchase everything, from groceries to cars, online, and it’s all thanks to e-commerce businesses. In 2020, the U.S. e-commerce market generated $431.6 billion in revenue, and that number is expected to reach upwards of $560 billion by 2025.
But with a rapidly growing market, it’s become increasingly difficult to make your customer experience superior to those of other e-commerce businesses. With so many more retailers moving to an online model, partially due to the pandemic, you need to find ways to stand out as a brand online.
The ability to attract and retain customers comes from a clear understanding of your retail customer journey. This journey helps you know more about your customers, as well as the how and why behind their purchase decisions. In turn, your e-commerce business will have a better shot at showing each consumer the right thing at the right time to net a purchase.
To help create a seamless retail customer journey for your e-commerce business, here are five tips you should follow.
1. Understand Your Audience’s Needs
Every successful retail customer journey starts with a deep understanding of your customer and their needs. Depending on your product, your e-commerce business should carefully monitor your brand’s larger buying trends. Knowing what delights your customers enough to make a purchase can help you inform your retail customer journey.
Look for crucial buying trends on different channels your brand owns. What are your conversion rates off of a particular paid social media ad versus high traffic organic pages? Knowing these types of details can help save your business money, so it’s not investing heavily in channels that haven’t traditionally been lucrative.
It’s also important to dive deeper into customer psychology and find out specifics. How many products are they buying at one time? What time of day are most purchases occurring? Every bit of information you can find about their buying trends can help you learn more about how your customers interact with your products.
2. Analyze Your Product’s Purchase Timeline
In order to help your customers along their journey, you need to understand your core product and its purchase timeline. The purchase timeline determines how much time you’ll need to allot for mapping out your customer journey.
The timeline for consumers buying a low-ticket item is generally pretty fast. If your e-commerce business is selling a pair of socks, you don’t need a ton of customer journey touchpoints to make a sale. The consumer usually knows what size socks they need, and maybe they have a color already in mind. People generally go straight to a website and purchase because they already have a good idea of what they need.
For higher-ticket items, it’s a different story. When a consumer is looking to purchase something like a new sofa, it’s not usually a spur-of-the-moment decision. Instead, the consumer might research several e-commerce businesses that sell sofas. They go through multiple customer journey touchpoints, like educational blog posts or even conversations with a sales representative.
Expensive products from e-commerce businesses need to be supported by solid content and sales representatives to drive home their value. As a result, your business should expect that the retail customer journey will take more time to complete. It’s no different than going to a brick-and-mortar store and taking longer to decide on purchasing a product that comes at a premium price point.
3. Determine Your Strongest Conversion Paths
Conversions for e-commerce businesses don’t materialize on their own, although it would be great if they did. It’s important to identify the strongest conversion paths, so you can double down on where your target audience actually comes from and stop pouring money into channels where they don’t.
Taking time to find which conversion paths are most effective for your business is critical. It can help you find out each of the individual steps a buyer takes on their way to a purchase. You need to understand where customers are coming from to invest marketing dollars in those specific channels.
The more you know about your winning conversion paths, the more insight you can gain into where customers decide to purchase your product. That insight is critical because it can inform marketing and sales strategies.
Any easy way to find out which conversion paths result in the most purchases is to run a Top Conversion Paths report in Google Analytics. This report tells you the exact sequence of channel interactions that led to a conversion and how many conversions occurred on each path

Source: Search Engine Journal
You’ll be able to gauge if your top conversion paths skew heavier toward paid or organic efforts, which can be valuable in developing future content. Maybe most of your audience is making purchases directly after reading a great blog post, and you don’t need to dump more money into that expensive Facebook ad campaign.
E-commerce platforms like Shopify can grant access to analytics that will give you insight into what products are selling and which ones are collecting dust on your virtual shelf. Keep an eye on things like which products are selling most consistently and how frequently those purchases occur over a select period.
Ensure that you’re also tracking essential insights related to the discount codes and referral programs your business offers. If sales are still down despite the good deals you’re offering, how can you get more potential customers to know about them? Maybe you need to create more touchpoints on social media, offer deals to website visitors that live chat with your business, set up display ads for new or remarketed audiences, and other channels to get the word out.
4. Show Brand Transparency Through Your Content
Great content marketing is the secret weapon behind every great e-commerce business and is often what your audience interacts with most on their retail customer journey. That said, content comes in many different flavors, and businesses shouldn’t choose one with blinders on.
The best e-commerce businesses understand that they’re not the only show in town. It’s simple enough to do a Google search that will list several retail competitors in your industry—many of which may have better pricing. To combat that, your business needs to create content that acknowledges the competition and doesn’t try to show them in a poor light.
Why? Today’s consumers value brand transparency. They want to see brands talk about where they source materials, how they treat their employees, and costs go into determining a brand’s prices. Gen Z consumers—who are quickly rising in numbers as buyers—value brand transparency and want to see more of it from brands they buy from. Having content that shows this information is an excellent way to give consumers confidence in the company from which they’re buying.
5. Refine Your Non-Brand Touchpoints
In a retail customer journey, this is where things get a little interesting. Retail brands have multiple channels that may reach outside of their owned properties. You might sell your product directly on your site, but it might be available on sites like Amazon and Etsy as well. These sites can also be considered sales and marketing channels for your product.
With that in mind, you can’t simply focus on your owned channels as touchpoints. If your product is sold on another site, like Amazon, for example, ensure all your product descriptions and information is always up-to-date. Every channel that sells your product should give consumers everything they need to understand what your product can help solve.
Visualize Your Retail Customer Journey Map
With all the information you need to build one, it’s finally time to create a retail customer journey map for your e-commerce business. We’ve even put together a customer journey mapping template to help you with all the information you need to get started and keep a visual record of your retail customer journey efforts.
The post 5 Ways to Strengthen the Retail Customer Journey for Your E-commerce Business appeared first on Alexa Blog.
Read more: blog.alexa.com
Effective Marketing Strategies in 2021 Have These 5 Elements
It’s safe to say that 2020 threw some curveballs no one could’ve predicted.
But even with a global pandemic, one thing stayed constant for companies: The best marketing strategies still involved connecting with consumers as humans.
During 2020, people craved brand connections more than ever. They wanted to know their favorite companies still cared for them during challenging times. They wanted to know there were people behind the logo who were there for them, even in small ways.
So in 2021, don’t be surprised to see more companies focusing on making customers and prospects feel more comfortable and supported. And if you want to have one of the best marketing strategies in your respective industry, you need to take note of these five elements.
Fast, Responsive Communication
Customers and prospects in 2021 want to connect with brands, and they want to do it fast. They expect answers to their questions when they need them. According to the Zendesk Customer Experience Trends Report 2020, “Half of customers choose a channel based on how fast they need a response.”
And if you want to communicate quickly as a business, there are plenty of options. Instant messaging apps like Kik and WhatsApp became increasingly popular in 2020. Meanwhile, social media platforms like Facebook and Twitter are still channels where people seek answers. Having a presence on these channels can help your business communicate with customers and prospects faster.
Of course, in an ideal world, you would have the budget to hire hundreds of live customer service reps to work 24/7 to help you do that. Unfortunately, most businesses don’t have room in their budgets to hire that many live reps.
Don’t worry, though — we’ve got a workaround for that.
Investing in a chatbot is a great customer service alternative that can give your business the fast, responsive communication your customers and prospects want without adding an extra burden on your live reps. Chatbots won’t replace live reps who still play a critical role in the marketing and sales process, but they can streamline many simple asks.
Investing in a chatbot is a great customer service alternative that can give your business the fast, responsive communication your customers and prospects want without adding an extra burden on your live reps.Click To Tweet
Let your chatbot handle small inquiries about your product or service so your live reps can focus on more complex tasks. Take our word for it: It’s the customer service duo you need in 2021.
More Detailed Audience Insights
It’s critical to learn what things matter to customers and prospects. Having a strong grasp of those items can help you create better content for consumers, which can also be used to market to their specific interests and needs.
Social listening technology, such as Alexa’s Content Exploration tool, can help you uncover content that is generating interest on social platforms — and getting amplified by an audience — for a given topic.

Learn from the content that’s striking a chord to help develop your brand voice and insert your unique angle into new and existing content.
Personalized Recommendations at Scale
Technology continues to evolve, and how consumers get information is evolving along with it. There are so many ways to build connections through technology now, many of which will become a part of the best marketing strategies.
One prime example of technology that builds trust is chatbots. And there’s a great opportunity to start utilizing them more in 2021. Less than 30% of businesses offered self-service, live chat, social messaging, in-app messaging, bots, or peer-to- communities in 2020.
And outside of their most obvious use case as customer service boosters, chatbots can also function as trusted confidants for potential customers and prospects.

In the example above, from Levi’s, their Virtual Assistant chatbot helps a user choose the perfect pair of jeans. With such a wide array of different product styles and fits, the Virtual Assistant can be a good way for Levi’s customers and prospects to get the exact style and fit of jeans they want.
In many ways, a chatbot is like a helpful retail store clerk guiding customers through different product options to find the right fit. This individualized service makes people far more likely to trust your brand because it’s actually helping them simplify a potentially complicated purchase.
Branded Entertainment
We love to be entertained. We want to be moved much more than we want to be sold to.
Some brands have caught on to this and are producing a form of entertainment that doesn’t feel like advertising. The idea is that when you provide entertainment, you’re likely to build awareness through social sharing. And, at the same time, you build affinity for your brand.
Google, for example, made this commercial for Super Bowl LIV in 2020, which has since amassed over 62 million views on YouTube. It featured an older gentleman trying not to forget the love of his life, who had presumably passed away. He used Google to help him take a trip down memory lane and remember all the good times they’d shared.

Not every marketer has the budget to support a video like this. But there’s an opportunity for branded entertainment on a much more attainable scale, too. Think of podcasts and do-it-yourself YouTube videos, both of which have been embraced by many small-business owners. Some are even combining the two to give audiences double the options for tuning in.
The beauty of branded entertainment is that it brings your values to life. It shows your company’s personality and helps people decide if they really like you, all before you’ve asked them to buy anything. So when it comes time for them to make that choice, you already have a foundation of trust.
Accountability and Transparency
Marketers often struggle with showing the real, authentic face of a company. It’s natural for business leaders to want to spin a story and create a face that’s perfect in the eyes of the customer.
But customers know that no business is perfect. And the more we try to gloss over the not-so-perfect parts, the more we erode consumers’ trust.
Take, for example, social media company Buffer talking about the mistakes they themselves have made on social media. They were able to create an insightful piece of content for their audience by focusing on past missteps made as a brand. It’s a valuable lesson wrapped in an entertaining story.
Build the Best Marketing Strategies in 2021
Getting to know your customers on a deep level isn’t necessarily new for marketers, but the importance it will have in 2021 has grown. With more people staying at home during the pandemic, it’s important to prepare for digital interactions and make sure they run smoothly at all times.
If you need a little extra help getting access to critical data on your competitors and your audience and on popular content in your industry that can help guide your own marketing strategies, we’ve got you covered. Start your free trial of Alexa’s Advanced Plan today.
This article was originally published in October, 2019 and updated on February 8, 2021.
The post Effective Marketing Strategies in 2021 Have These 5 Elements appeared first on Alexa Blog.
Read more: blog.alexa.com
Why WordPress Hosting Is Better Than Shared Hosting For Bloggers
Do you have a blog on WordPress or are you planning to start a WordPress blog soon? And is your blog on a shared hosting plan? Then let us clarify why WordPress Hosting is better than shared hosting for bloggers like you.
Let us first make sure you know the difference between the two types of hosting. When you share the physical space for your website or a blog on a physical server with many other users, you have shared hosting. Every user gets a part of the server to store their data. Sometimes hundreds of users share a single server. As far as shared hosting is concerned, they offer a variety of site builders in addition to WordPress site builders. This makes the resources allocated to WordPress sparse.
On the other hand, when the hosting services are optimized to host the WordPress websites for better performance and security, WordPress Hosting is formed. In this type of platform, no other type of hosting is shared on the designated servers. In addition, some companies offer you the facility of managed WordPress hosting. This means that WordPress hosting is done on the servers of these companies and they also provide many features for facilitating the users.
Why WordPress Hosting Is Better Than Shared Hosting For Bloggers
WordPress Hosting is pricier than Shared Hosting. However, WordPress hosting has many advantages over shared hosting to justify the extra cost. In the case of bloggers, their failure or success is dependent on the performance of the host. Hence, the advantages of the WordPress host hold much weight for the bloggers.
Let us look at the benefits of WordPress Hosting:
1. Speed
Speed is one of the most important factors to be considered while choosing a host. The less loading speed of your website means you will be ranked lower on a search result of any search engine including Google. The search engines consider speed as one of the factors to rank the search results. It has been observed that around 75% of the people do not go past the first page of the search result. Hence, it is imperative to rank your website as high as possible to increase the footprints of the viewers.
The number of view matter a lot for the success of your website. It is responsible to increase the revenue from the website by increasing the number of views. The main benefit of WordPress hosting is the speed it provides over shared hosting.
In the case of shared hosting, if the traffic on the other site hosted with you is more, your website will load slowly. You are not guaranteed any resources when you opt for shared hosting. The network may face frequent downtime reducing the traffic on your website further.
WordPress hosting is dedicated to WordPress sites only. It is beneficial for your websites because all the other websites are also on the same platform. The loading speed will not depend on the traffic on other websites. Also, the downtime on a WordPress hosted site is very low.
If we talk about managed WordPress Hosting, it is even better than regular WordPress hosting. The loading time is much faster and the uptime is guaranteed by the host which is generally above 99%.
Read also: How to Increase Website Speed
2. Security
The security of your data and website is one more factor that is crucial to the hosting of a website. It is seen that the frequency of brute force attacks is increasing every day. In May 2020, the number of brute force attacks crossed 100,000 a day. Hence, it becomes critical to have a professional guide for your data and websites.
When you use shared hosting, you have to take care of your own security. Of course, you can buy extra security measures, but everything about security is to be handled by you. You will become more exposed to malware and brute force attacks in this type of hosting.
On the other hand, when you opt for WordPress Hosting, you become comparatively more secure from these types of malicious attacks. There are plugins that will provide you security and you do not have to worry about it again.
Additionally, when you host your site on managed WordPress, it becomes the duty of the host to protect against malicious attacks. They will generally have enterprise-level security for their clients. Also, they can avert any attack before it reaches your website and you will be safer than ever.
Read also: How to Increase your Website Security
3. Support
When you are just starting your website, you will be unaware of how things work. You will need support from somebody to setup everything for you. If you already have a website and it is generating more traffic than you expected, you will need somebody to guide you on how and where to migrate your host service provider.
In case you have shared hosting, you will have to handle everything yourself. Even if you are tech-savvy, it becomes a headache for you to manage so many different things at a time along with continuing your business. After your website grows it is next to impossible to continue on shared hosting.
Perhaps this is the reason why 38.5% of all websites on earth are hosted on WordPress. WordPress gives you substantial support for setting up and managing your website. There are huge resources available to you if you are stuck anywhere.
As far as managed WordPress host is concerned, customer support is their forte. These companies have WordPress experts hired to help you through any issues you face. Customer support is also available 24/7 so you can contact them anytime.
Read also: Things to do after Installing WordPress
4. WordPress Optimized Hosting
When you are hosting your website on WordPress but on a shared host, you will have many other people who will be sharing this host server with you. Your environment will not be optimized to accommodate WordPress exclusively. There will be other CMS’s data and websites as well. It is a huge mess at the end of the day.
On WordPress hosting, every plugin, every step is taken just for the websites like you. All the measures are taken to curate your experience on WordPress. This makes it easier for you because you are just a few clicks away from doing anything you desire.When you host on managed WordPress host, it is even easier and simpler for you. Features like staging areas, control panels, etc. are offered to help you with your website.
5. SSL Certificates
Secure Sockets Layer (SSL) certification has become unavoidable if you want to deal online. SSL certification assures your clients that your site is safe for making transactions. Most customers will not make transactions on your site if they do not see an SSL Certificate for your site.
Some of the shared hosting does not provide you a facility of SSL certificate. You have to apply and procure required documents which will take days. You will have to communicate with the authority to have an SSL certificate.
When you have WordPress hosting the process becomes easier. In fact, when you have a managed WordPress host you will not have to do anything or spend a penny for SSL certification. The companies manage SSL certificates for your websites for free. Moreover, nothing is required of you. It is a one-click operation.
Read also: Best SSL Certificate Providers 2021
6. Easy to Manage
It is not easy to manage your website and your business together. You will waste hours in managing your site.
Shared hosting will not provide you any help with the management of your website. If you have more than one website, it will be an impossible task juggling between everything.
WordPress hosting will assist you to manage all your websites much easier and in an organized way. If you have managed WordPress host, then you will get access to great facilities like cPanel or custom panels to manage all your websites from a single place. It might also help you to make management decisions by showing you visitors’ stats, billing, sales, payments, etc. in one place.
7. Additional Features
Shared hosting offers you some features for an extra payment. You can buy those for better management.
However, WordPress hosting and managed WordPress hosting offers features you did not even know you needed. Features to collaborate with clients and other agencies, thousands of themes and templates to create attractive and unique websites, educational resources, and many more are a part of managed WordPress hosting. These features will make your website from ordinary to special and that will bring you numerous benefits.
The need for extra plugins also vanishes when you have managed WordPress host. They will give you facilities of caching, backups, security, performance enhancements, etc. with their plans.
8. Reselling your Website
What if you are not satisfied and you want to sell off your website? What about the investment you made to make the website what it is now? Shared hosting will not support you in your decision to sell your website.
On the contrary, there are millions of WordPress users around the globe. So it becomes easier to sell your website if you have hosted it on that platform.
A managed WordPress host will even help you to find a customer for your website on their site.
9. Easy to use Development Tools
Development tools are required if you are tech-savvy and want to design your own website or even if you want to make some changes to your existing website.
Shared hosting will not offer the use of any such development tools for your use. WordPress, on the other hand, has many tools if you want to build your own website. Managed WordPress hosts even provide special packages to developers to build their websites.
Conclusion
If you are just starting a website or a blog, Shared Hosting might sound attractive to you at first but remember, your goal is to grow and with shared hosting, it is not always possible to grow. WordPress hosting even if it looks pricey at first sight will prove to be much more beneficial to you in the long run. So our recommendation will be to have a WordPress Host for your blog.
Best Shared Hosting: HostGator
Best Managed WordPress Hosting: Dreamhost
Author Bio:
Kyle Roof is a digital marketer having expertise in various marketing fields online out there. He runs several blogs on Web Hosting & WordPress including GrabHosts.net where you’ll find him writing about Reviews, Tutorials, How-to Guides & Statistics.
The post Why WordPress Hosting Is Better Than Shared Hosting For Bloggers appeared first on WPressBlog.
Read more: wpressblog.com
14 Important WordPress Maintenance Tasks To Do Regularly
Have you ever visited a place that you immediately wished you hadn’t? If yes, you know what it feels like – downright chokingly uncomfortable!
And this is exactly how your website visitors would feel if you let your WordPress site sit without a regular maintenance schedule.
Your WordPress website is no different than any other kind of property you own. And like all properties, your site needs to be maintained on a regular schedule.
Why is WordPress Maintenance so Important?
Regular maintenance is crucial for all kinds of online assets whether it’s a website or software application. But when we talk about WordPress, it becomes even more critical.
In fact, if your bread and butter depend on your WordPress site, WordPress maintenance becomes a full-time job.
You need to make sure your website doesn’t break at unexpected times, works at optimal speed at all times, and above all, stays secure against cyber-attacks. You wouldn’t want your online store getting hacked during a sales campaign, would you?
14 WordPress Maintenance Tasks
1. Visit Your Website and Inspect the Frontend
When maintaining our website, we spend most of our time on the WordPress admin panel, forgetting the frontend.
To make sure your site is working at its best, inspect it by visiting the frontend at least once daily. By visiting your site, you can catch a lot of errors like typos, design flaws, broken links, etc.
2. Have a Daily Backup Schedule
Having regular backups is of utmost importance and we can’t stress that enough. Losing your site data due to security compromises and not having backups can be disastrous – unless you don’t really give a damn about your website. But if you do, back it up at least once daily and store the backups at a safe location.
Getting Managed WordPress Hosting like Kinsta and WP Engine can relieve you from a lot of maintenance troubles especially when it comes to making backups. These hosting services offer automatic daily backups and help you in maintaining your site and keeping it secure.
3. Keep WordPress Core Updated
The security of your WordPress site is paramount. And while it takes a lot to harden your site’s security, one of the most important yet simplest things to do is to keep WordPress core software updated.
Keep in mind that if an update becomes available, every minute your site stays on the old version poses a great security risk. Check for updates every day and keep the WordPress core updated.
4. Update Plugins and Themes
The next important step to ensure WordPress security is to keep your WordPress themes and plugins updated. Delaying or not updating themes and plugins is the biggest mistake people make in maintaining their site.
It’s simple: if a new version of any theme or plugin is available, it means there is a vulnerability in the previous one and so, unless you update, your site stays vulnerable to attacks.
Check for updates on a daily basis and update whenever new versions are available.
when developing your WordPress Site, make sure to make a child theme so you can easily update the parent theme without losing your customizations.
5. Check Page Load Speeds
Your page load speed affects your SEO ratings and also prevents visitors from strolling away from your site. Regularly check your page load speeds using tools like Google Page Speed Insights and follow on the recommended suggestions to optimize speed and performance.
A few tips for optimizing your page load speed:
Get Managed WordPress Hosting like Kinsta,Optimize your images by using image optimization tools,Use a CDN (Content Delivery Network) for better page speeds.
6. Check for Broken Links
Letting a 404-page end the conversation with your site visitors is too bad. Not only this, but broken links also hurt your SEO. Audit your site regularly using tools like W3C Link Checker to find any broken links and fix them.
And when it comes to the 404-page, make sure it’s designed well and helps the visitor get back to your site. Include links to other pages, a sitemap, and a search bar to help the user find what they need.
7. Post Regularly
An active blog with a regular posting schedule gives a boost to your SEO ranking and brings in traffic. High quality, valuable content once a month is much more valuable than useless junk filling up your blog every day.
Whatever schedule you choose, just don’t let your blog go stale.
8. Test Your Site for Responsiveness
Do I need to stress the need for a site that works well on mobile? A site that doesn’t look and work well on multiple devices hurts your SEO rankings too, not to mention how much it would hurt your visitors to land on a site that is difficult to use on mobile. Use tools like Google’s Mobile-Friendly Test to check for your site’s responsiveness.
9. Test Your Forms
If there are forms on your site, make sure they are working properly. Test them regularly and check if you are getting Emails or not.
10. Clear Website Cache
Caching is a useful strategy to optimize page loads as it saves time by storing information and avoiding the need to re-obtain the same information from the server. However, caches have only a finite amount of space and when they get full, it slows down your site.
Clear your website cache once a month and especially after updating WordPress core, themes, and plugins.
11. Clean Junk Data
Many WordPress plugins can help you clean junk data like comment spams, older versions, leftover settings from uninstalled plugins, etc. Delete any unused plugins as well.
12. Monitor the Security of your Site
WordPress Security Plugins like iThemes Security or Sucuri can help you keep an eye on the security of your WordPress Site. Checking your site logs regularly helps you stay safe than sorry. They can help you keep track of changes in your site so you can ensure nothing is wrong.
In addition to that, curate your user accounts at least once a month and remove users that haven’t logged in a while. Also, make sure admin accounts are only held by those that need it.
13. Validate Your Website
To make sure everything works as expected, the code should be valid. Check your WordPress markup regularly using tools like W3C Markup Validation Service.
14. Make Regular SEO Efforts
SEO involves a lot of things and can’t be covered here in the scope of this article. It should be a part of your daily maintenance schedule. Make sure to have strong internal linking on your site. Whenever something new is posted on the site, it should be strongly linked internally within your site. Use tools like Yoast SEO to stay on top of your SEO efforts.
All in all…
Creating your website and letting it sit without regular maintenance is just like letting your home or office collect dust and become an ugly place that scares people away.
These WordPress maintenance strategies will help you keep your site well-optimized, secure, and well-maintained.
Author Bio:
Jibran Ahmed Sheikh is a WordPress Expert at Codup.co. A tech fanatic by day and a reader by night, Jibran enjoys exploring the ever-changing world of Technology, Development, and eCommerce.
Read also:
30+ Things That You Need To Do After Installing WordPressWhy WordPress Hosting Is Better Than Shared HostingHow To Check Your WordPress Website for Malware & Get it Fixed
The post 14 Important WordPress Maintenance Tasks To Do Regularly appeared first on WPressBlog.
Read more: wpressblog.com